
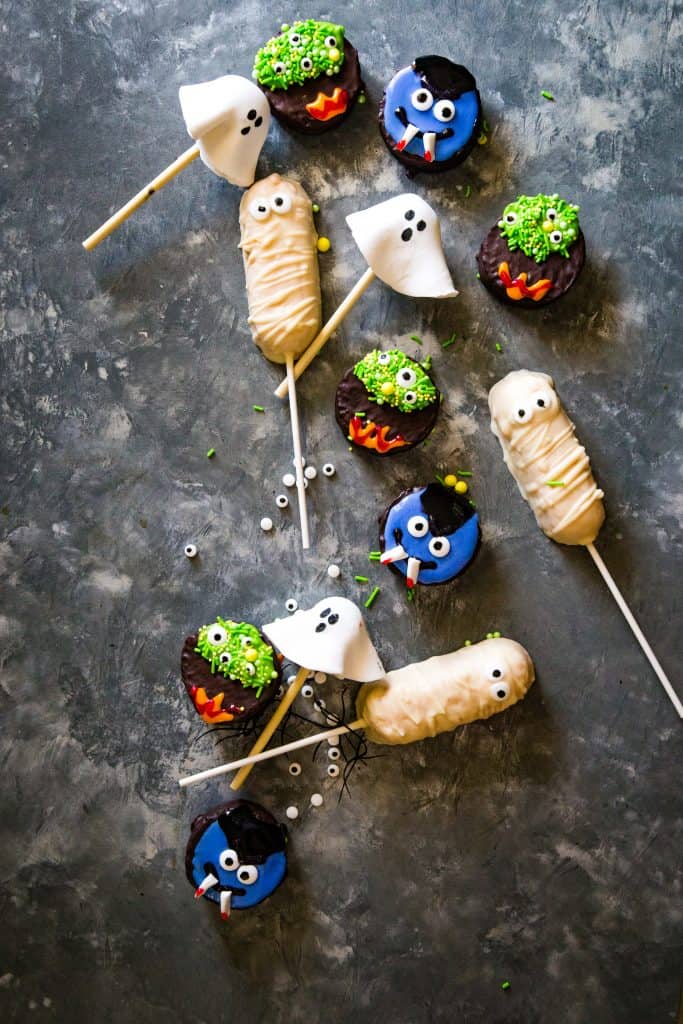
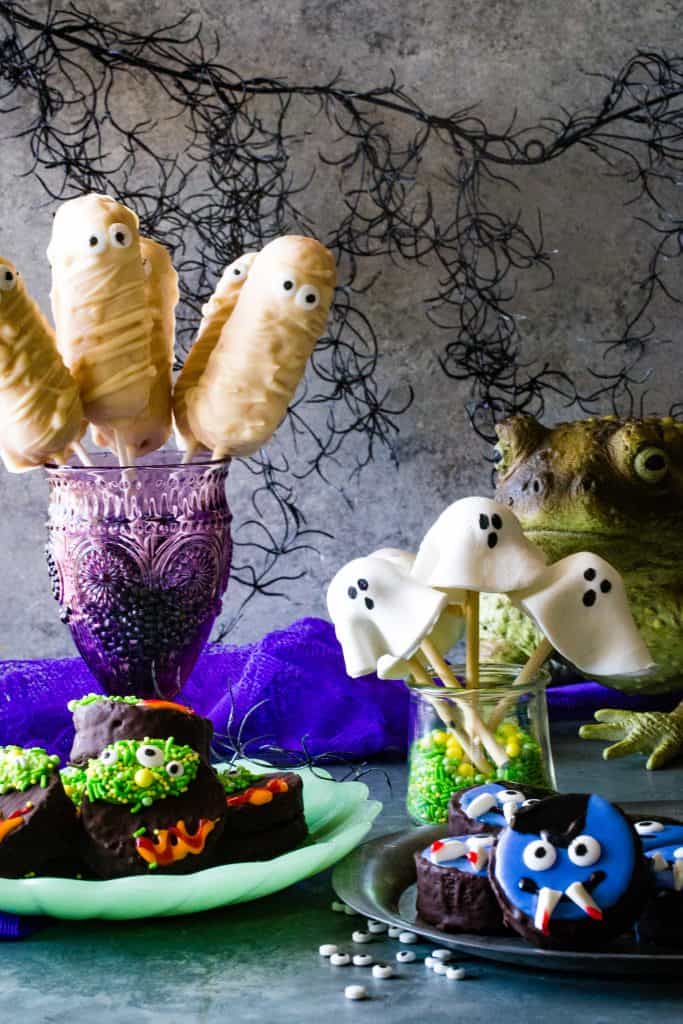
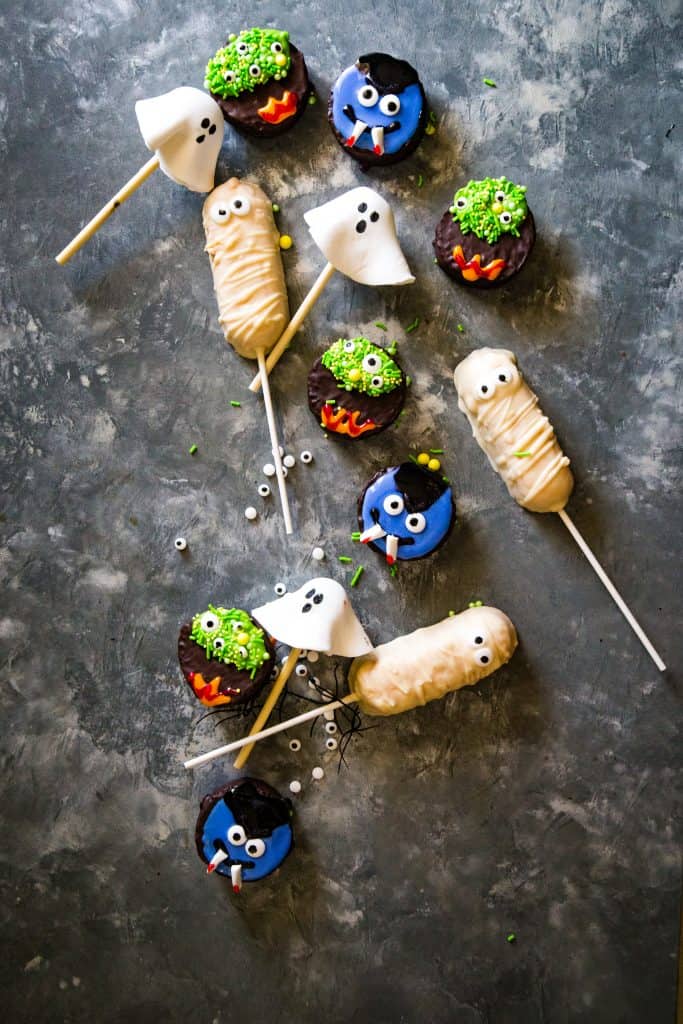
Four No-Bake Halloween treat ideas that are so easy, the kids can get involved. These terrifyingly tasty treats include Donut hole ghosts, Ding Dong Vampires, Mummy Twinkies and Witch’s cauldrons.
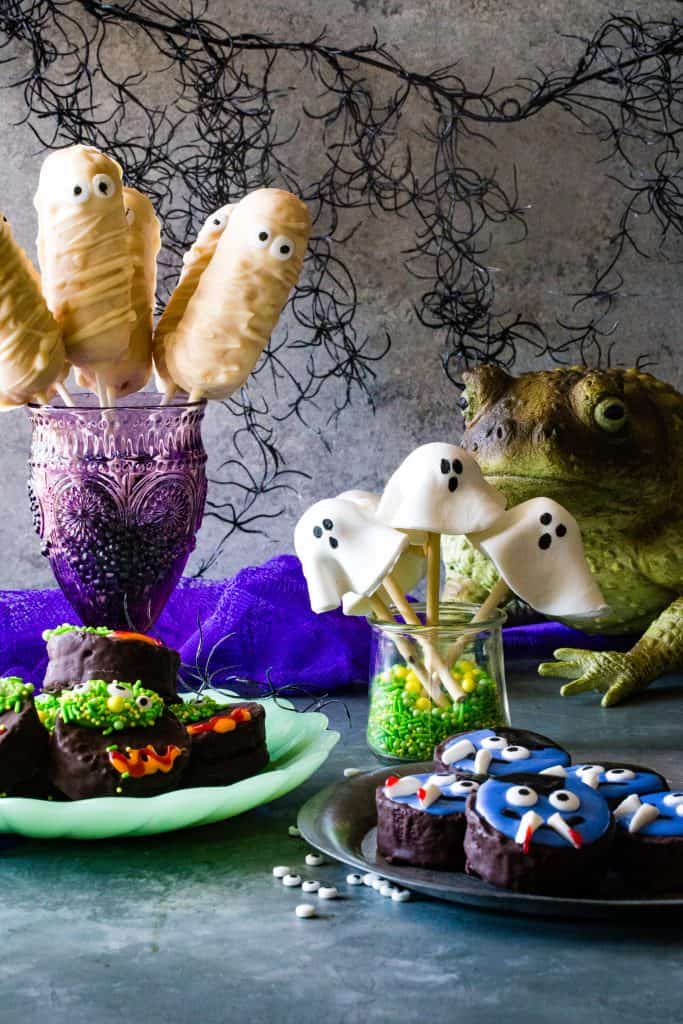
If you need some easy treats for fall, these four Halloween Treat ideas are the cutest and quickest out there. Take classic treats like donut holes, Ding Dongs, and Twinkies and turn them into a spooktacular dessert – all without switching on your oven. Thanks to my no-bake methods, they are perfect for little ones as an edible craft project to help celebrate the spooky season. The best part is that they are all with minimal prep, ingredients and mess - exactly what you want to hear at this time of year!
These fun treats are great for those planning a spooky soiree on a budget as you simply need to dip and decorate classic treats that you likely already have at home. No endless ingredient lists or exotic demands, the focus is on fuss-free fun that the whole family can get involved in making and eating.
While I’ve provided step-by-step instructions, I encourage you all to get creative and customize these no-bake Halloween desserts. Use whatever candy, sprinkles and frosting you have to hand or you feel inspired by at the grocery store. Forget perfection with these recipes, it’s all about spending time together and let’s face it, they’ll taste delicious regardless of how these spooky treats look!
Beware these treats are tricky to resist but if you can, they also make unforgettable party favors for your nearest and dearest ghouls and gals. Alternatively, serve them as spooky snacks to brighten up lunchboxes or as handouts for trick or treaters. If you’re craving more easy but eerie desserts, why not try my vampire milkshakes, Halloween dipped marshmallows, or our Halloween Chocolate Covered Strawberries for other no-bake delicious treats favorites.
WHY WE LOVE THESE NO BAKE HALLOWEEN TREATS
- Super quick – All four of these sweet treats can be whipped up in under 30 minutes each. This is ideal for one of the most chaotic times of year!
- No Bake – Not only are these no-bake recipes speedy, but with no ovens involved it makes them extra kid-friendly. Think of these Halloween treats as fun fall crafts for kids of all ages or the perfect activity for fun Halloween parties.
- Budget-friendly – These recipes use family favorites such as Ding Dongs, Twinkies and donut holes as the base meaning you won’t have to bake from scratch and buy all the ingredients to do so. Chances are, you may even have these in your pantry already saving you time and money as you can skip a trip to the store.
- Crowd pleasers – Just because these no-bake treats skip the oven, doesn’t mean they skip on flavor. With the addition of colorful coatings, frosting and candy details your everyday snacks are transformed into delicious desserts that are guaranteed to impress all ages. Each recipe serves 12 but it’s also super easy to double up for bigger batches.
- Customizable – While I’ve provided step-by-step instructions and images to replicate these no-bake treats, feel free to get creative. It is so easy to customize each one by switching up the color schemes or adding extra candy. You could even adapt them for Christmas with the Twinkie ghosts switching to snowmen and making Rudolph or Santa ding dongs instead.
EASY INGREDIENTS/SHOPPING LIST
- Donut holes plain or glazed
- Ding dongs unwrapped and chilled
- Twinkies
- Lollipop sticks
- White chocolate coating
- Purple coating chocolates
- Black coating chocolates
- Green coating chocolates
- Coconut oil
- White fondant
- Orange frosting
- Powdered sugar
- Candy eyes or edible eyeballs
- Candy fangs
- Red food gel
- Edible ink black marker
SUBSTITUTIONS AND ADDITIONS
- Coconut oil – When using a candy coating, the coconut oil thins out the chocolate making it easier to apply to your treats. If you do not have coconut oil to hand, you can use vegetable oil in its place, if desired.
- Piping bag – Instead of the usual piping bag, I prefer switching to just a baggie with the very corner snipped off. I find it’s much easier to do the piping this way (and less fiddly for little hands) with the bonus there are no tips to clean afterward.
- Candy eyes and fangs – These should be easy to find in the grocery store at this time of year, but if you struggle you can use white fondant or white chocolate then add a dot of black food color for the eyes. You could also use candy such as the tips of candy corn as fangs.
- Glitter and sprinkles – Would it even be Halloween if I didn’t encourage additional sprinkles or sparkle? Instead of ordinary food color gel, you can also get sparkly food color which adds a fun twist to thIS no-bake simple Halloween dessert treats. You may also struggle to resist additional sprinkles especially when the little ones are in charge of decorating.
RECOMMENDED TOOLS TO MAKE THESE EASY NO BAKE HALLOWEEN TREATS
- Microwavable bowl
- Rolling pin
- Spoon
- Sharp knife
- Tall microwave safe glass
- Baking sheet (lined)
- Styrofoam board
- Piping Bag/baggie with corner snipped off
Check out the video for these No Bake Halloween Treats above then scroll down for each individual recipe and step-by-step printable instructions!
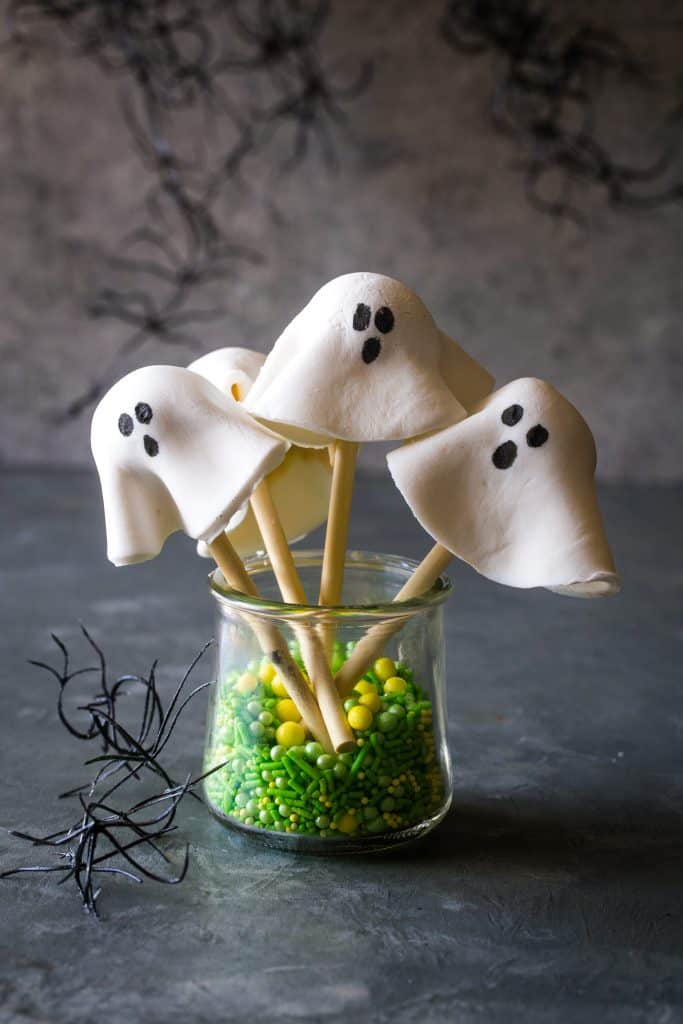
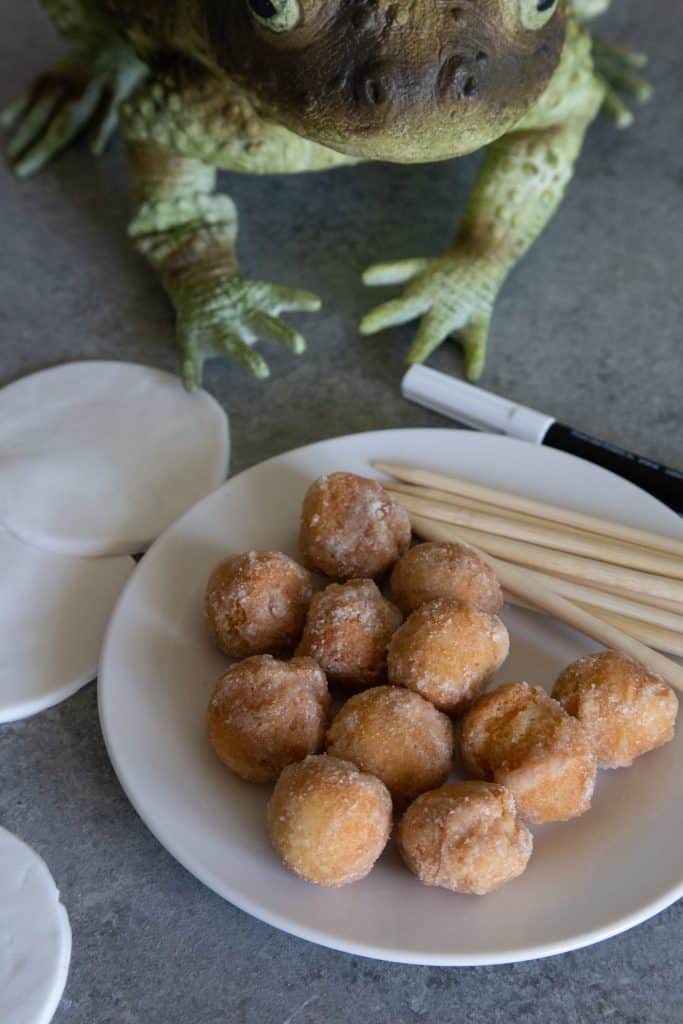
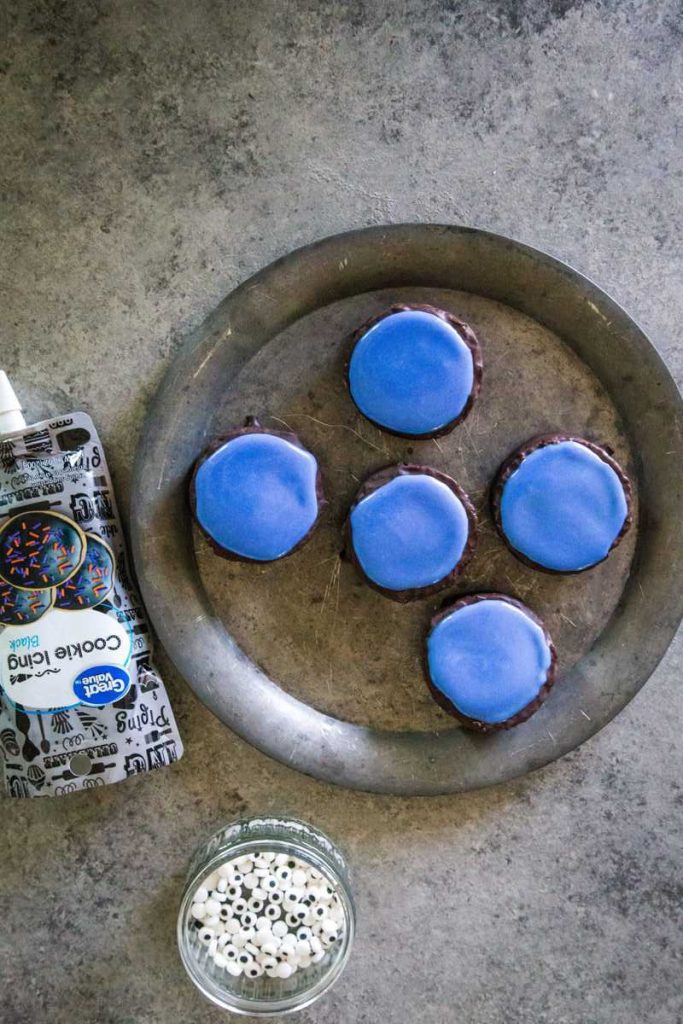
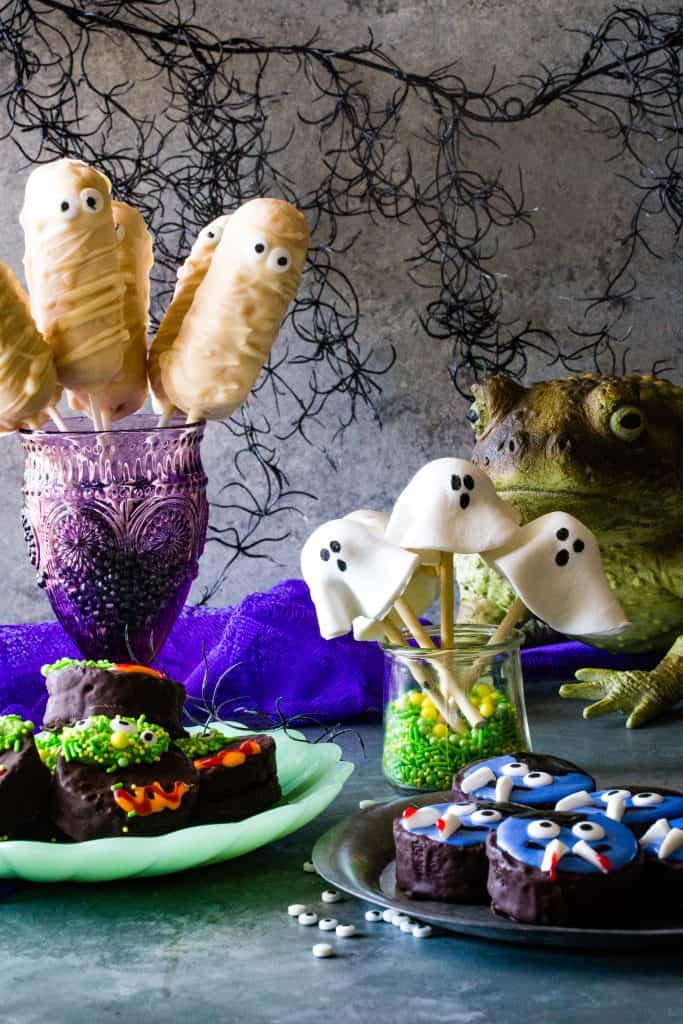
HOW DO YOU MAKE GHOST DONUT HOLES
Donut Hole ghosts are ghoulishly delicious and deceptively simple to make. Donut holes dipped in white chocolate are then covered with a skirt of white fondant ready for you to scribble on a spooky face with edible ink. Beware these irresistible little fellows may cause frights and fights as the whole neighborhood will want one.
1. Melt – Melt the chocolate coating and coconut oil in microwave safe bowl in the microwave for 1 minute. Allow to sit for one minute then stir until smooth.
2. Dip – dip the tip of the lollipop stick in the chocolate coating then insert it into the donut hole. Dip each donut in white chocolate and tap to remove any excess. Stick in a styrofoam board or on a cookie sheet to dry completely.
3. Fondant – Sprinkle powdered sugar on your surface (and cover your hands) before rolling out the fondant until it is ¼ inch thick. Cut out large 3-inch rounds. Gently pull to stretch slightly then place over the chocolate-coated donut hole. PRO TIP: Cut the rounds using a sharp knife, cookie cutter, or even the rim of a glass or mug.
4. Spooky face – give your ghost a spooky face using edible ink pens.
5. Store – Enjoy immediately or keep in an airtight container for up to 2 days.

Just a few simple steps to these spooky Ghost Donut Holes
- 12 donut holes plain or glazed
- 12 lollipop sticks
- 1 cup white chocolate coating melted
- 1 teaspoon coconut oil
- 1 cup white fondant
- powdered sugar for rolling fondant
- 1 edible ink black marker
-
Melt chocolate coating and coconut oil in microwave safe bowl in the microwave for 1 minute. Allow to sit for one minute then stir until smooth.
-
Dip tip of lollipop sticks in chocolate coating then insert donut hole. Dip each donut in white chocolate and gently tap to remove excess coating. Stick in styrofoam board or on a cookie sheet to dry completely.
-
On a powdered sugar sprinkled surface, roll out fondant until it is ¼ inch thick. Cut out large 3-inch rounds. Gently pull to stretch slightly then place over chocolate coated donut hole.
-
Carefully draw two eyes and mouth on fondant for face and enjoy.
-
Store in an airtight container for up to 2 days.
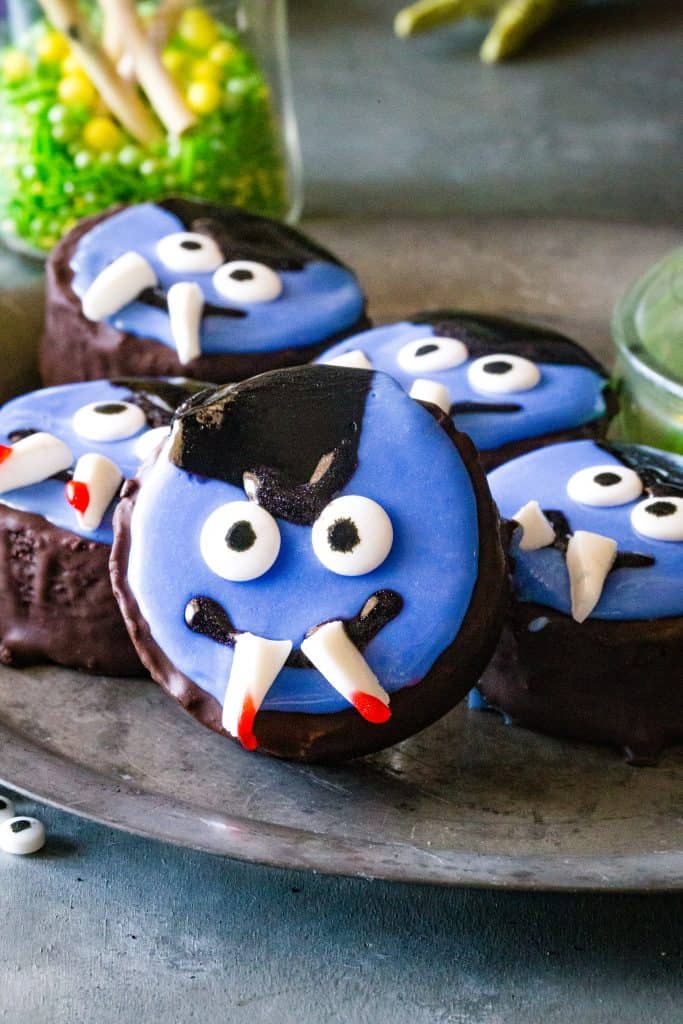
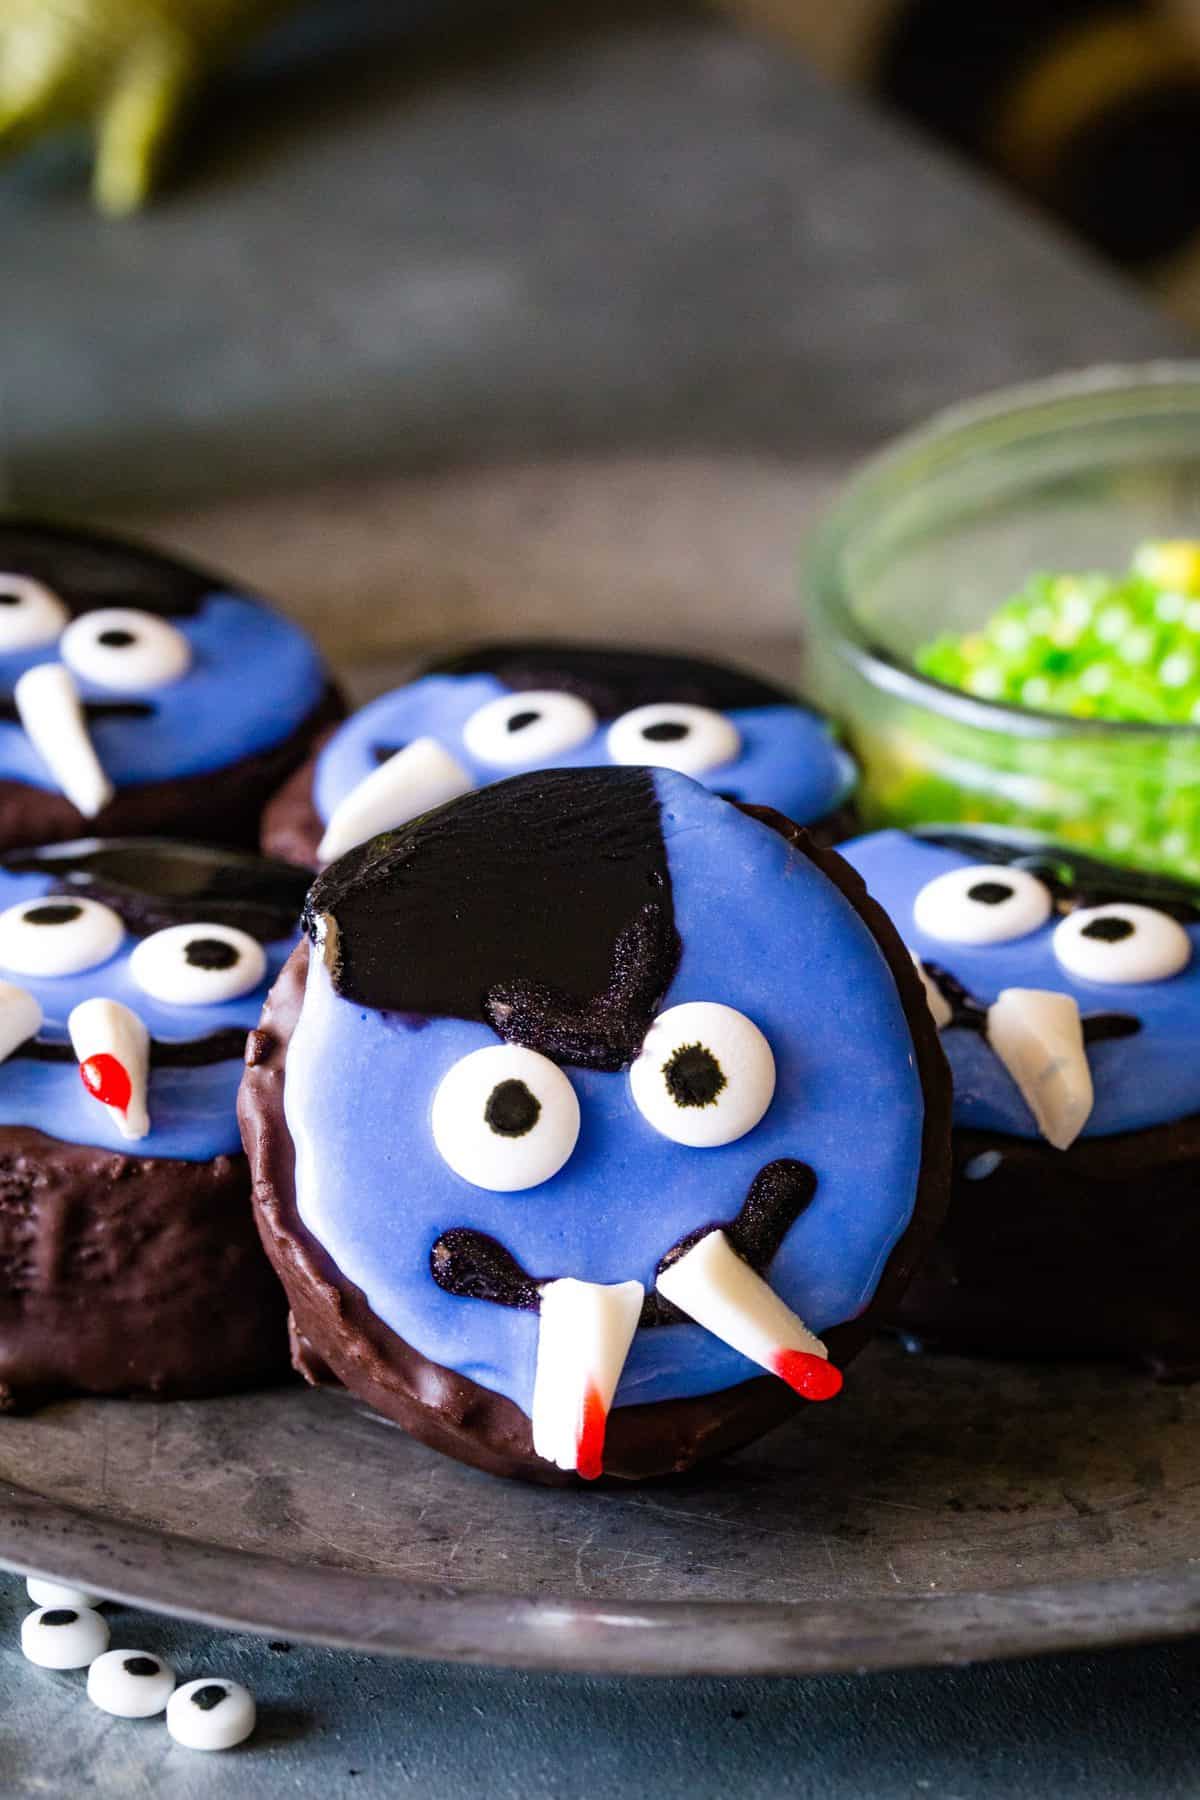
HOW DO YOU MAKE VAMPIRE DING DONGS
Halloween isn't complete without some spooky yet cute vampires! Using pre-made Ding Dongs and some colorful candy coating, this edible craft is easy enough for the kids to make on their own but too fun for you not to get involved.
1. Melt - Melt the purple candy melts with the coconut oil until smooth. Place in a piping bag or an ordinary baggie with the corner snipped off. Repeat this with the black candy melts.
2. Coat - Make a heart shape over most of the ding dong with the purple coating chocolate. Fill in the rest with black candy coating.
3. Add details - Put the candy eyes in place and draw the eyebrows and mouth. Add the fangs and blood to the tips. PRO TIP: You will need to add the details quite quickly before the chocolate sets.
4. Dry and Serve - Allow decorated Ding Dongs to dry completely (about 20 minutes) then serve immediately or store in an airtight container for up to 2 days.
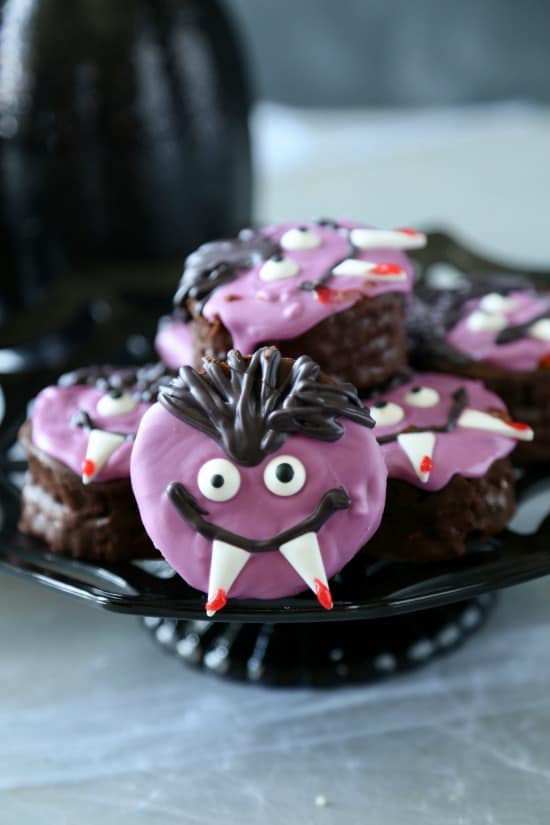

These No-Bake Vampire Ding Dongs are cute and easy to make
- 12 Ding Dongs unwrapped and chilled
- 1 cup purple coating chocolates
- 1 cup black coating chocolates
- 2 teaspoons coconut oil divided
- 24 candy eyes
- 24 candy fangs
- red food gel
-
Melt purple chocolate coating wafers in a small bowl with 1 teaspoon coconut oil on high for 1 minute. Let rest 1 minute then stir until smooth. Once smooth, pour into pastry bag or ziplock bag with the corner snipped off for pipping.
-
Repeat with black chocolate coating.
-
Pipe a large heart shape over ⅔ of the top of the ding dong with purple chocolate.
-
Pipe the remaining space with black chocolate for the hair.
-
Place candy eyeballs in the upper center of the purple chocolate.
-
Pipe eyebrows and smile with black chocolate.
-
Add fangs and garnish tips with red gel.
-
Allow decorated Ding Dongs to dry completely, about 20 minutes.
-
Serve immediately or store in airtight container for up to 2 days.
Vampire fangs can be found here (affiliate link).
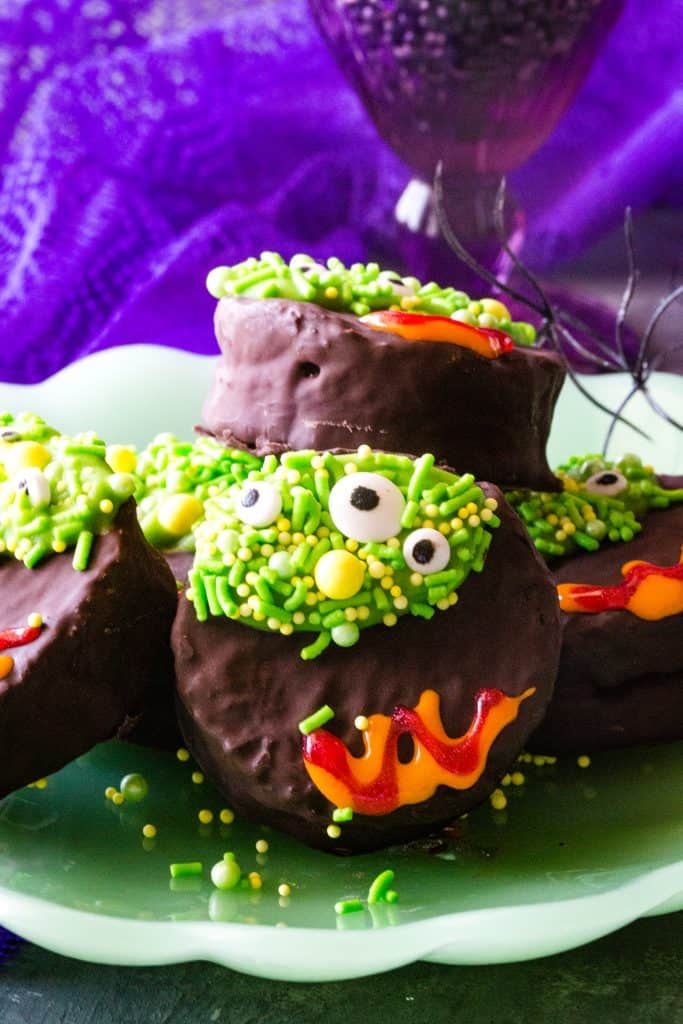
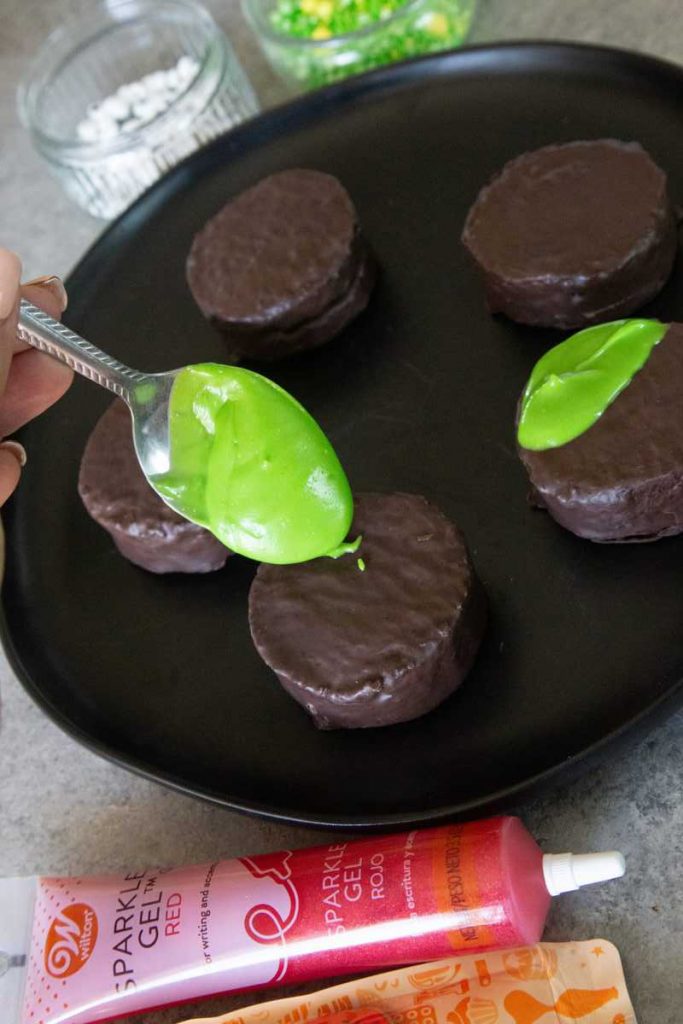
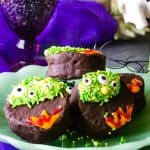
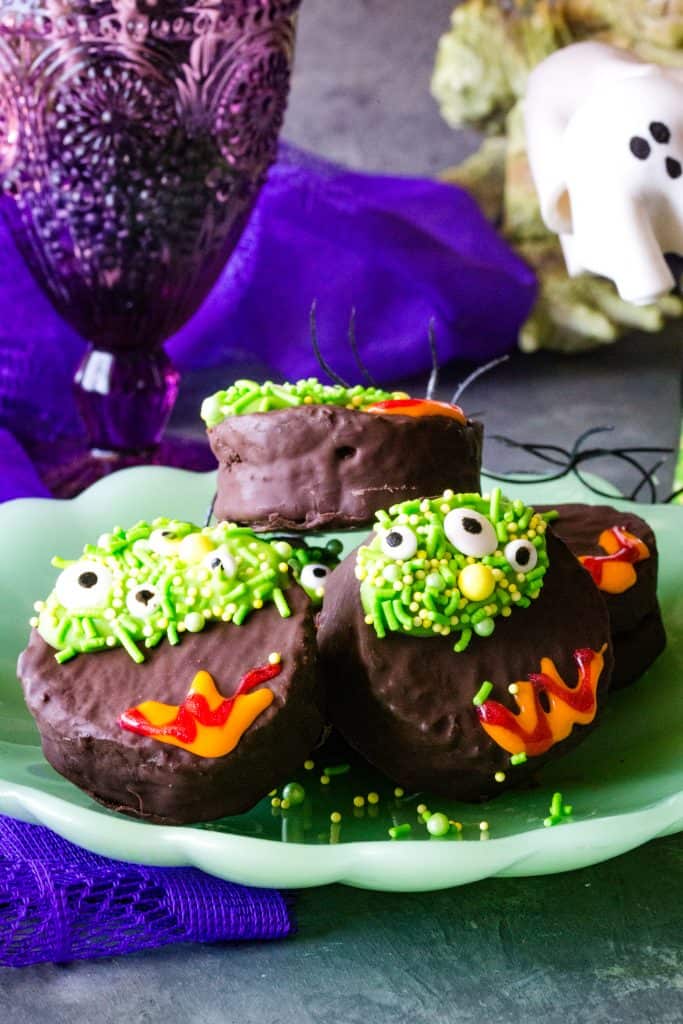
HOW DO YOU MAKE DING DONG WITCH’S CAULDRONS
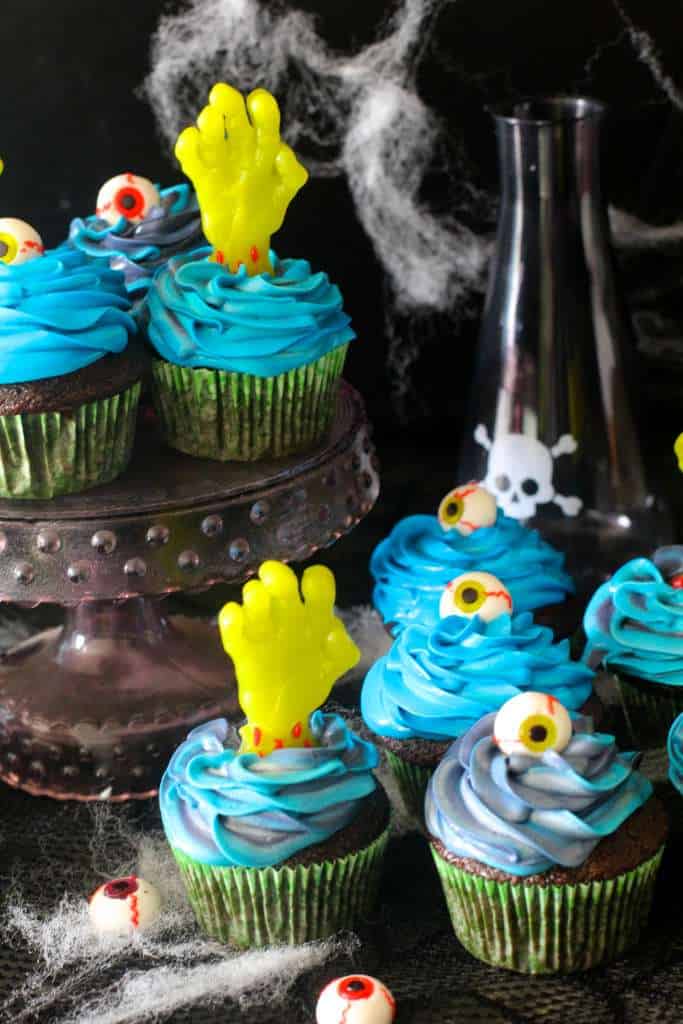
Devouring these Ding Dongs witch’s cauldrons full of potion, won’t turn you into a toad but they will magically make you crave more sweet treats. While these cauldrons are overflowing with green goo and googly eyes feel free to get creative with your own magic potion – the possibilities are endless! Pair them with our witch's hat Halloween cupcakes for more fun!
1. Melt - Combine the chocolate and oil and microwave until melted.
2. Decorate - Add a dollop of the green chocolate melted candy to the top of each ding dong to replicate magic potion. Quickly add candy eyes and green sprinkles before the candy sets. Add some gummy worms too for more fun!
3. Add flames - At the bottom, use the orange frosting to draw flames, with accent flames in red.
4. Dry and Devour - Let dry and enjoy immediately or store flat in an airtight container for 2 days.
Every Witch needs their brew, and this is an easy recipe to make your own!
- 12 Ding Dongs unwrapped and chilled
- ½ cup green chocolate coating wafers
- ½ teaspoon coconut oil
- 36 candy eyes
- green sprinkles
- red food gel
- orange frosting
-
Melt green chocolate coating wafers and coconut oil on high in microwave for 45 seconds. Allow to sit for 1 minute then stir until smooth.
-
Spread a dollop of green chocolate on the upper part of the ding dong. Place a few candy eyes on the green chocolate and sprinkle with green sprinkles.
-
Pipe fire flames at the bottom of ding dong with orange frosting then add red gel to accentuate the flames.
-
Store flat in an airtight container for up to 2 days.
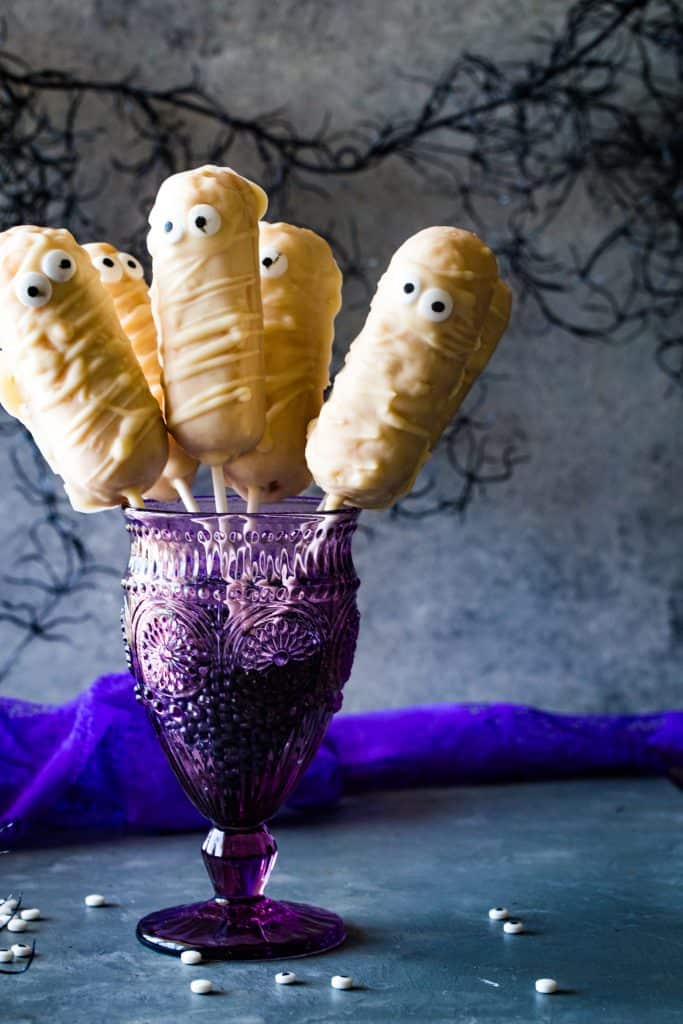
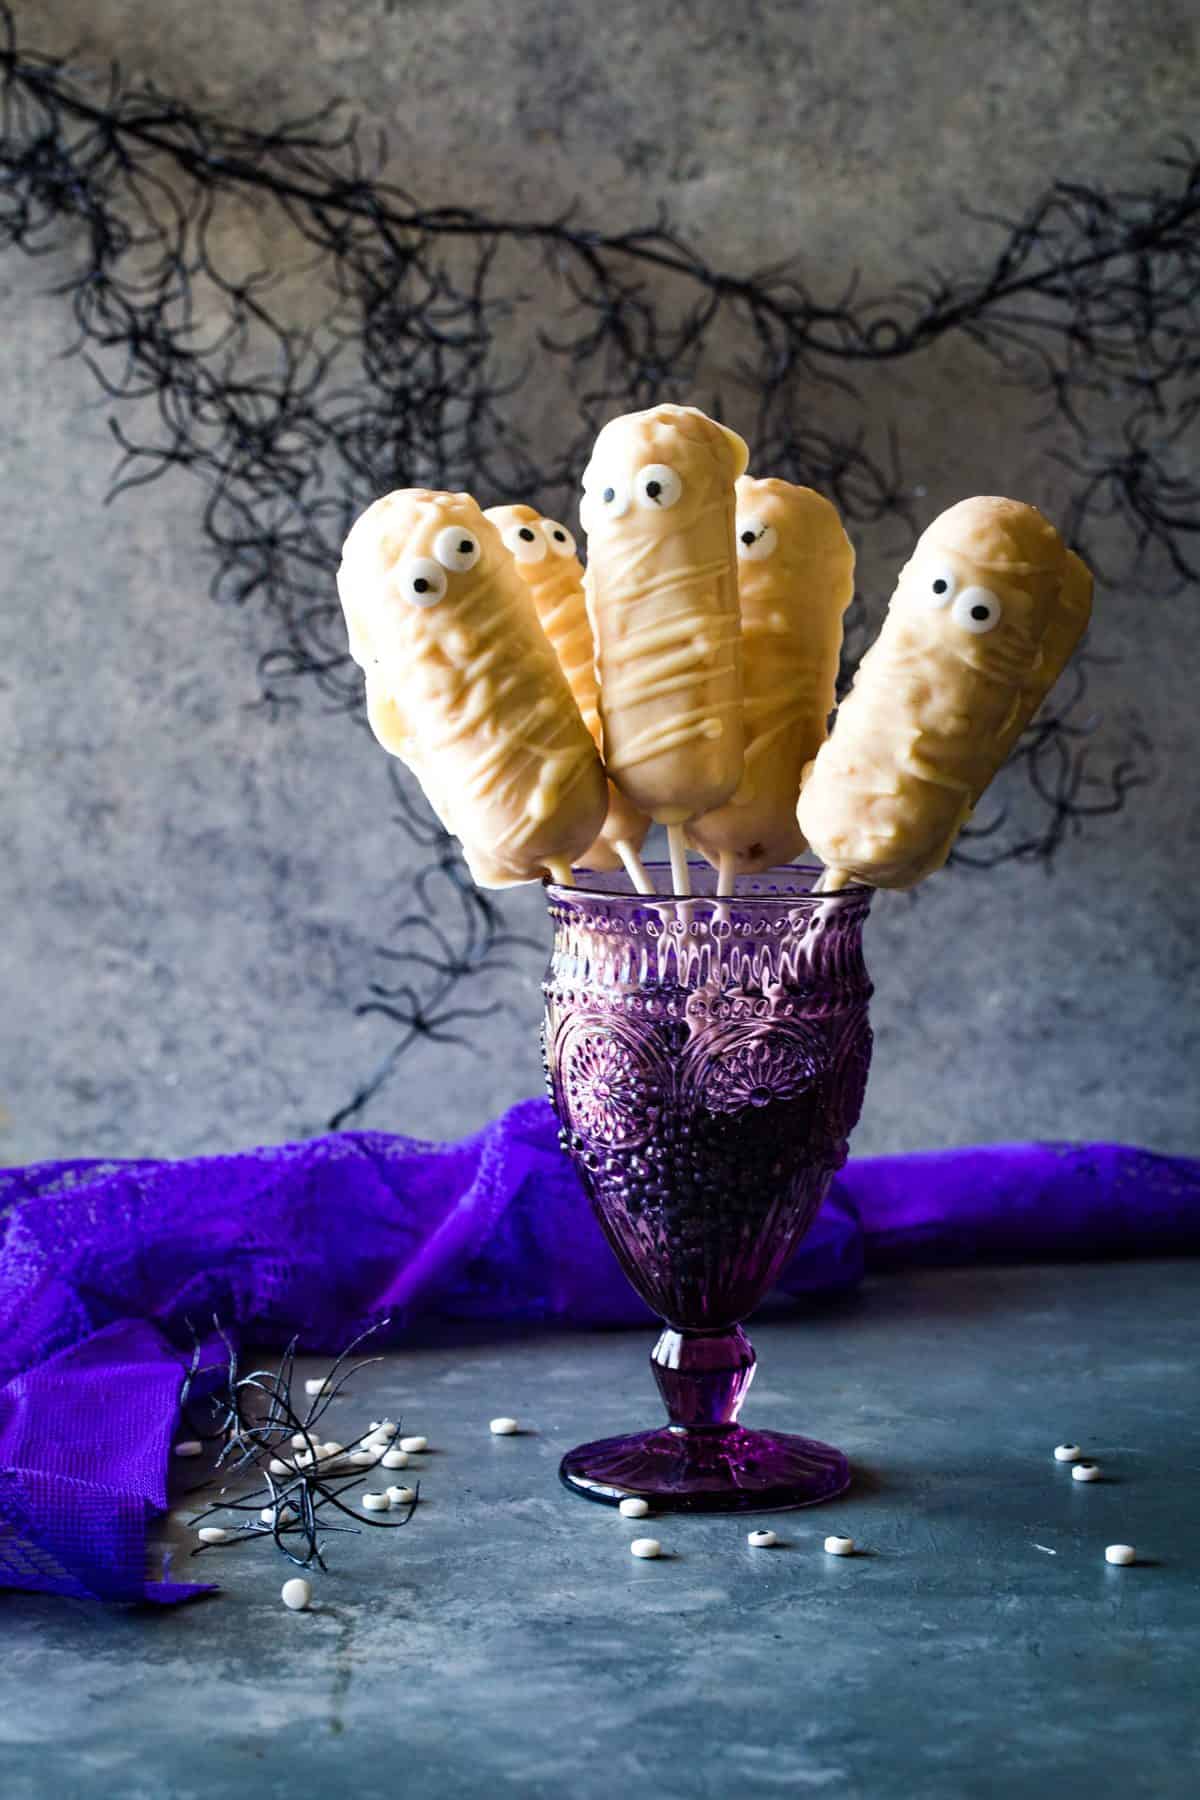
HOW DO YOU MAKE TWINKIE MUMMIES
With chocolate on top of chocolate, what is not to love about these Twinkie mummies? Twinkies are dipped in white chocolate candy melts then drizzled with more chocolate and garnished with spooky eyes for mummies that will melt in your mouth. You can also use white chocolate chips and milano cookies for these to make mummy cookies!
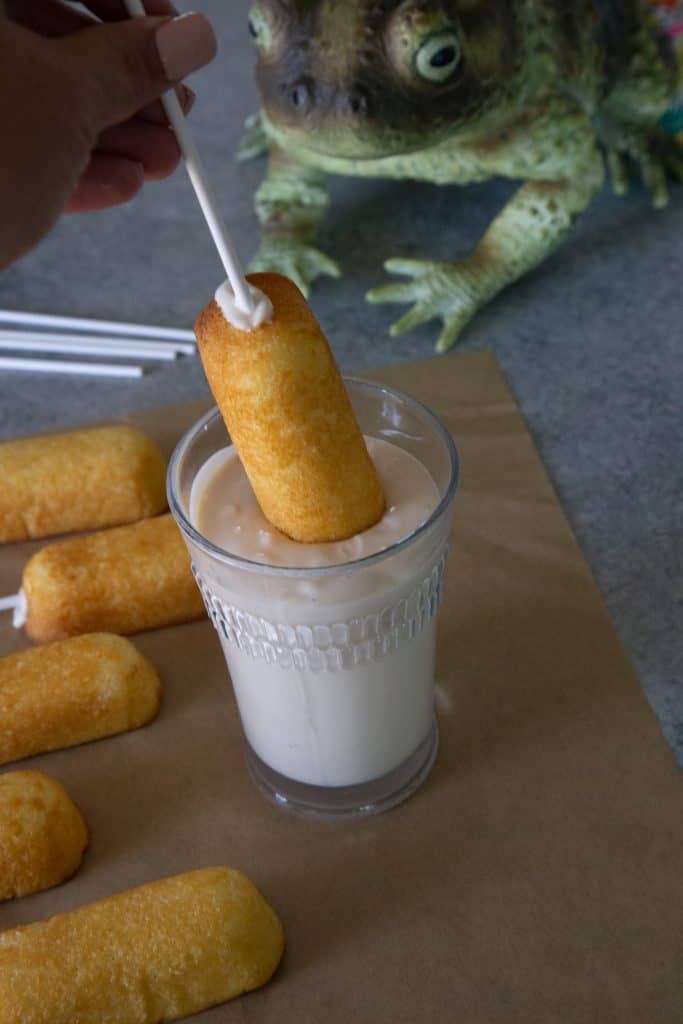
1. Melt - Combine the white chocolate and coconut oil in a tall glass and microwave until melted. PRO TIP: Triple check the glass you choose is microwave safe!
2. Stick - Dip each lollipop stick tip into chocolate then insert ⅓ into the Twinkie. PRO TIP: Make sure the lollipop stick is at least ⅓ into the Twinkie. If it is too shallow, the twinkie will fall off into the melted chocolate and you’ll have a mummified mess on your hands.
3. Dip – Dip the twinkie in the glass of chocolate until fully submerged. Pull out of the chocolate allowing any excess to drip off then allow to dry on a prepared baking sheet.
4. Decorate - Add the remaining chocolate to a piping bag and make lines across the twinkies to imitate bandages. Add the candy eyes.
5. Dry - Allow to fully dry and enjoy!

A simple no-bake treat that is frighteningly delicious!
- 12 twinkles unwrapped and chilled
- 12 lollipop sticks
- 2 cups white melting chocolates
- 1 teaspoon coconut oil
- 24 candy eyes
-
Melt white chocolate wafers and coconut oil in a tall and narrow glass for 1 minute. Allow to sit for one minute, then stir until smooth.
-
Dip each lollipop stick tip into chocolate then insert ⅓ into the Twinkie.
-
Dip entire Twinkie into chocolate to coat. Place on a lined cookie sheet to dry.
-
Pour remaining chocolate in a ziplock bag and snip the corner. Drizzle lines onto coated Twinkies. Add candy eyes.
-
Store in an airtight container for up to 2 days.
NO-BAKE TASTY HALLOWEEN TREAT TIPS
- Remove excess chocolate - Always give your treats a little tap or wiggle to ensure any excess globs of chocolate fall away. If not, they won’t look as smooth, and lumps of the coating may chip off when it dries.
- Don’t overcook the coating - The candy melts don’t take long to melt. Microwave them separate bowls in 20-second intervals and stir in between to avoid scorching. If you overcook them, it will cause the chocolate to seize and it will be useless.
- Get the kids involved - Hosting a Halloween party? These no-bake treats are a great way to keep little ones entertained. You could set up a dipping and decorating station with the various coatings and sprinkles. Everyone will get into the Halloween spirit with these!
- Act Fast – When working with melting chocolate you’ll need to be quite speedy in order for the candy eyes and sprinkles to stick before it sets. It’s also advised to work quickly when dealing with fondant as the heat from your hands can cause the fondant to stick and tear.
- Give as gifts – these no-bake Halloween treats are ideal party favors or hand outs for trick or treaters. Simply wrap them individually using treat bags to share with family and friends. It's an easy way to become the cool mom on the block!
STORAGE TIPS
- I recommend enjoying these no-bake Halloween treats the same day they are made. Do not refrigerate them as the moisture may cause the decorations to run and it will cause cracks on the fondant.
- If you need to store them, place them flat, in an airtight container (make sure not to overlap any) and keep them at room temperature for up to two days.
- Alternatively wrap them individually using treat bags and give them away as party favors.
FREQUENTLY ASKED QUESTIONS FOR THESE PERFECT HALLOWEEN TREATS
WHERE CAN I BUY FONDANT?
You can buy fondant at most grocery stores in the baking aisle. Places like Walmart and Target will be your best bets as smaller stores might not carry it. You can also find it at Michael’s, Hobby Lobby, or online at Amazon, etc. It’s really easy to find and there are a few recipes online for making your own fondant as well. If you feel like getting creative, you could also opt for colorful fondant instead of white. If you have extra fondant, make a batch of our Marshmallow ghosts cupcakes.
WHAT ARE CANDY MELTS?
These are usually pieces of candy that are shaped like discs or wafers. They’re similar to white chocolate but are meant to act like a candy coating more than chocolate. They taste just like white chocolate and come in various colors, making it easier to make fun no-bake Halloween treats like these.
HOW TO AVOID BURNING CHOCOLATE IN THE MICROWAVE
Although it’s super convenient melting candy coating chocolates in the microwave, it’s also super easy to scorch as they will continue to cook after you take them out. This is why I recommend short increments with stirring afterward to avoid scorching it.
If you have some time on your hands, you could melt the chocolate in a double boiler. This is where a glass bowl with the chocolate is placed over a pan of simmering water. It takes longer and is not the best method with little ones about, but it means you can keep an eye to prevent burning.
Please feel free to share your experience with making these No Bake Halloween Treats in the comments below or on social media!
OTHER HALLOWEEN RECIPES YOU MAY ENJOY
For more Halloween themed desserts, check out these posts-
Jolina
Halloween is so much fun! And these awesome treats would make any party that much more Halloweeny 🙂 I mean, how adorable are those twinkie mummies???
Ant
I love no-bake treats. Will have to do this next year for my little guy's birthday.
Willow
These are adorable! I don't have kids, but I bet my nieces would love these!