• Skip to primary navigation
  • Skip to main content
  • Skip to primary sidebar
The Seaside Baker
  • Home
  • Cookbook
  • About
  • Recipes
  • Contact
menu icon
go to homepage
  • Recipes
  • About
  • Cookbook
  • Contact
    • Facebook
    • Instagram
    • Pinterest
    • Twitter
  • subscribe
    search icon
    Homepage link
    • Recipes
    • About
    • Cookbook
    • Contact
    • Facebook
    • Instagram
    • Pinterest
    • Twitter
  • ×
    Home » Recipes » Sweets

    Ladybug Cupcakes

    Published on March 31, 2014 by theseasidebaker Last Modified on June 12, 2017 / 5 Comments

    6 shares
    Jump to Recipe

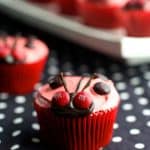
    The snow is melting, the flowers are blooming, and the bees are buzzing! Spring is here! Let's celebrate spring with these adorable Ladybug Cupcakes!

    I am a big kid when it comes to baking and I absolutely love baking and decorating with with M&M'S® Brand Chocolate Candies. In fact, I am on a quest to make the perfect M&M'S® cookie because they are so festive when coordinated holiday colors!

    These cupcakes are almost too cute to eat. My kids went wild for the M&M'S® Brand Milk Chocolate Candies eyes and of course devoured them first.

    The were super easy to make and a blast to decorate! They would be perfect for your spring fling party or just a fun treat for your kids!

    Visit www.bakingwithmms.com for creative ideas and inspiration. Are you looking for some sweet Easter inspiration? Visit TASTE OF HOME and READER'S DIGEST for some adorable pastel treats!


    Print
    Ladybug Cupcakes
    Author: Jackie
    Ingredients
    Ladybug cupcakes
    • Prep Time: 15 min.
    • Bake Time: 25 min.
    • Decoration Time: 20 min.
    • Difficulty: Easy
    • Yield: Makes 24 ladybugs
    • ¼ Cup M&M'S® Brand Chocolate Candies
    • 45 Pieces chocolate malted milk balls , cut in half
    • 1 Box favorite cake mix
    • ? Cup dark chocolate frosting
    • 1 Container vanilla frosting
    • Red food coloring
    • 12 Black licorice laces , cut into 48 pieces
    • 2 Cupcake pans
    • Paper cupcake liners
    Instructions
    Ladybug cupcakes
    1. Prep Time: 15 min.
    2. Bake Time: 25 min.
    3. Decoration Time: 20 min.
    4. Difficulty: Easy
    5. Yield: Makes 24 ladybugs
    6. Prepare the cake mix according to the directions on the package.
    7. Line the cupcake pans with the paper liners. Fill each cup with ⅔ cup of batter.
    8. Bake in a preheated 350-degree oven for 25 minutes, according to the directions on the package. Remove from oven.
    9. While waiting for the cupcakes to completely cool, tint the vanilla frosting with the red food coloring.
    Once cooled, frost the tops of the cupcakes as follows:
    1. Spread the tops of the cupcakes with the red frosting. Spoon the dark chocolate frosting into a resealable bag. Snip a small corner from the bag. Pipe a line of dark chocolate frosting down the center of each cupcake. Pipe an oval of the dark chocolate frosting at one end of the line, and decorate with the red M&M'S® Brand Chocolate Candies for eyes and the licorice for antennae. Dot the red portion with chocolate malted milk balls for the ladybugs' spots.

    Calories per serving 310

    Total Fat 16 g

    Saturated Fat 4 g

    Trans Fat 0 g

    Cholesterol 29 mg

    Sodium 256 mg

    Carbohydrates 42 g

    Dietary Fiber 1 g

    Sugars 30 g

    Protein 3 g

    Vitamin A 0%DV

    Vitamin C 0%DV

    Calcium 0%DV

    Iron 0%DV

    This is a sponsored conversation written by me on behalf of MARS. The opinions and text are all mine.

    « Milky Way Milkshakes
    Gluten Free Carrot Cake »
    6 shares

    Reader Interactions

    Comments

    1. Elizabeth @ SugarHero.com

      April 03, 2014 at 10:52 pm

      These are so darling! OF COURSE your kids loved them, because they're the cutest! What a great way to welcome in spring. 🙂

      Reply
    2. Heide M.

      April 07, 2014 at 5:24 pm

      Your cupcakes are so cute, what a clever idea.

      Reply
    3. atasteofmadess

      April 07, 2014 at 7:08 pm

      These cupcakes are so cute! They are pretty much screaming spring 🙂

      Reply
    4. kimberly.ann | bake.love.give.

      April 09, 2014 at 3:28 pm

      SO. CUTE. That is all I have to say about that!

      Reply
      • theseasidebaker

        April 09, 2014 at 3:51 pm

        Thanks Kimmie!

        Reply

    Leave a Reply Cancel reply

    Your email address will not be published. Required fields are marked *

    This site uses Akismet to reduce spam. Learn how your comment data is processed.

    Primary Sidebar

    Welcome to The Seaside Baker! Welcome to The Seaside Baker! Here you will find my personal journals of recipes, places, experiences, and everything else that comes along with being a mother of three by the sea!

    More about me →

    Popular

    • Quick Rhubarb Cake
      Quick Rhubarb Cake
    • Cold Fighting Smoothie
      Cold Fighting Smoothie- A Healthy Green Smoothie
    • Gruyere Scalloped Potatoes
      Gruyere Scalloped Potatoes- The Perfect Side Dish + Video
    • Strawberry Basil Vodka Cocktail
      Strawberry Basil Vodka Cocktail
    • Angel Food Strawberry Bundt
      Strawberry Angel Food Cake
    • corona cocktail in clear glass with colorful umbrellas on top
      Corona Cocktail

    My new cookbook is available now!

    Footer

    ↑ back to top

    About

    • Privacy Policy

    Newsletter

    • Sign Up! for emails and updates

    Contact

    • Contact
    • About

    As an Amazon Associate I earn from qualifying purchases.

    COPYRIGHT© 2025 · THE SEASIDE BAKER