Harvest Moon Bat Sugar Cookies
Prep Time
45 mins
Cook Time
10 mins
Total Time
55 mins
Let your inner artist out and paint your own masterpieces in icing.
Course:
Dessert
Cuisine:
American
Keyword:
Bat Cookies, Halloween Cookies
Servings: 18
Ingredients
Bats:
- 2 ounces good quality dark chocolate
- Bat silhouettes one or several shapes, easily printed from clipart found online 1-3 inches
Cookies:
- ½ cup butter softened
- ¾ cup white sugar
- 1 egg
- ½ teaspoon vanilla
- ½ teaspoon orange extract
- Zest from one large orange
- 2 ½ cups flour
- ½ teaspoon salt
- ½ teaspoon baking powder
- ½ teaspoon baking soda
- ⅔ cup sour cream
Icing:
- 1 ½ cups powdered sugar
- 1 teaspoon meringue powder This is optional, but will produce a firmer icing
- 3 tablespoons water
- ½ teaspoon vanilla
- Yellow orange, red, and brown food colors (unsweetened cocoa may be substituted for brown)
Instructions
-
Cover a baking sheet or piece of cardboard with parchment.
-
Melt chocolate in a small cup in the microwave at 15-second intervals, stirring often, or in a small pan at lowest heat on the stove. Put melted chocolate in a small disposable pastry bag or zipper-type plastic bag and cut a tiny opening at the tip for piping.
-
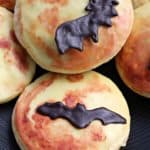
Place bat silhouette(s) under parchment. Pipe the outline with chocolate and then fill in the rest of the bat. Use a toothpick or the tip of the bag to help fill in all holes. Slide silhouette to the next spot if you’re just using one. Make 18 bats - or more if you’re putting two small bats on each cookie. Place in refrigerator or freezer until needed. Hint: if the icing hardens in the pastry bag while you’re working, place the pastry bag inside a zipper-type plastic bag, press the air out, close it, and put it tip down in a glass of hot water. Be careful not to get any water in the chocolate.
-
In a large bowl, beat butter and white sugar until soft and fluffy.
-
Add egg and beat well.
-
Mix in vanilla, orange extract, and orange zest.
-
In a small bowl, sift flour, salt, baking powder, and baking soda. Add half of the dry mixture to the butter mixture and stir until mostly incorporated. Dough will be stiff.
-
Stir in half of the sour cream.
-
Stir in remaining flour, then remaining sour cream. Cover and chill for 1 hour.
-
Preheat oven to 375 F
-
Roll dough out approximately ⅓-inch thick between 2 sheets of lightly floured parchment.
-
Cut out 3-inch circles, spacing them close together. Lift each one gently with a thin spatula and place 1 inch apart on an ungreased baking sheet. Bake for 10 minutes, until bottoms are lightly browned. Slide cookies onto a cooling rack immediately.
-
In a small bowl, combine powdered sugar, meringue powder, water, and vanilla. Add yellow food coloring, one drop at a time, until you achieve the color you want.
-
Remove 2 tablespoons of the yellow icing and place in a small bowl or plate. Set bowl of yellow icing aside. Add a little water to the 2 tablespoons of icing to thin it slightly, then create a palette of colors by adding orange, red, and brown coloring.
-
For best results, work with one cookie at a time. By adding the darker colors before the yellow icing dries you will achieve a surreal, marbled look. Dip the top of the cookie in icing (or use a spatula or knife if you prefer) and scrape gently on the edge of the bowl to create a thin coating.
-
With a photo of a full moon in front of you for inspiration, use a soft paintbrush, pastry brush, piece of sponge, or your finger to add designs resembling moon craters. Place on a baking sheet.
-
Carefully lift a bat (a thin spatula works well for this) and place on the cookie. Repeat!
-
Once icing is completely dry, cover the cookies and store at room temperature.