- 3 12-ounce bags of different colored candy melts: green, red, and white (I used Wilton)
- 1 package of Fudge Striped Cookies I used the Keebler brand
- Black white, red, blue & green edible glitter/sparkle gel
- Mini M&M’s I only used the red ones
- Gold & white beads I used the Wilton 4-Cell Gold Sprinkles Mix
- Red & silver sanding sugar
- Pull ‘n’ Peel licorice
-
Line a cookie sheet with parchment paper.
-
Prepare 8 licorice bows (4 for green and 4 for red cookies).
-
In a small microwaveable bowl, pour 1 ½ cups of one color candy melts. Then follow heating instructions on the back of the package. Make sure candy melts are all melted and the mixture is smooth.
-
Pull out one fudge striped cookie from the package and place the cookie (top side down) into the candy melts. With a fork, flip onto the other side, making sure that the cookie is completely covered.
-
With the fork, lift the cookie out and gently shake off excess candy melts and continue until the top is smooth.
-
Place the cookie on the parchment paper and decorate! It’s best to decorate while the candy melts are still warm in order for the decorations to stick. This works best by dipping 2-3 cookies and then decorating those before continuing with the remaining cookies of that color.
-
Repeat the process with the other colors of candy melts.
-
Once decorated, let the cookies cool for the candy melts to harden. Put the tray in the refrigerator for 10 minutes for faster cooling.
-
Serve chilled or at room temperature.
-
Store in an airtight container for up to two weeks.
-
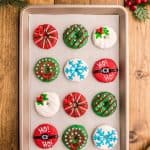
Holly Cookie: Use green glitter gel to draw the leaves, then add 3 red M&M’s.
-
Blue Snowflake: Sprinkle on silver sanding sugar, then draw snowflake with blue glitter gel.
-
Gold & White Beads: Draw red glitter gel lines, then add gold & white beads.
-
White Dots with Bow: Add the licorice bow while candy is still warm, then sprinkle red sanding sugar followed by white glitter gel dots.
-
Santa Belt: Put a mini M&M into the hole so the gel doesn’t fall through. Use black glitter gel to draw the belt, including filling in the center buckle, then add white glitter gel to highlight the buckle. Then add the “Ho! Ho!” with white glitter gel.
-
Green & White Stripes: Draw lines using the glitter gel, alternating between green and white, then add a licorice bow in the upper left.
Tips:
The glitter gel doesn’t harden all of the way, so be careful when eating and transporting. I would not recommend stacking.
To make the licorice bow, tear off one string of licorice. Take one end and make a small loop, then take the other end and make another small loop, while crossing the middle sections, like an “x”, over each other to make a bow. Firmly press together the part where the licorice crosses in order for it to stay. Then trim the bow ribbon to the desired length.
If candy melts are too thick, continue adding one teaspoon of vegetable shortening until desired consistency is achieved.
For the white candy melts, the chocolate from the cookie may start to melt and turn the white candy brown. The best way to avoid this is to place the cookie in the candy melts, top side up, and spoon the candy melts on top, remove, and shake off excess into another bowl so the chocolate drippings don’t mix with the white. This method is more effective for this cookie.